By Mary Ann Boysen
In this watercolor demo lesson we will paint "The Sugarbush"
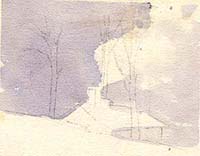
Step One (click to enlarge)

Lightly sketch your subject leaving the details for the brushwork to accomplish. Just block in the building and the placement of a few trees.
Begin with very pale washes of color. Use perhaps a pale yellow (Quinacridone Gold, followed by a pink (Opera), then a blue (Cobalt) for the sky. These colors will mingle on the page to create a glow. In the case here, I didn't place the blue over the entire page. I allowed the first two washes to dry before adding the blue around the building, and the foreground.
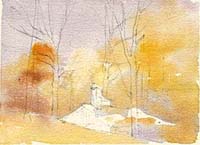
Step Two (Click to enlarge)

Because this is an autumn scene typical of northern Ohio where I live, I used strong golds made of Raw Sienna and Burnt Sienna and charged them into the wet washes that I had done previously. Not allowing the first washes to dry gave the golden colors a chance to blend with the rest, creating soft edges.
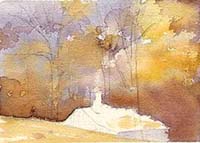
Step Three

I allowed the previous washes to dry, then I re-wet the surface above the horizon with clear water and added some punch with Indian Red and Burnt Sienna, to create more depth to the painting. By doing this the edges of this wash were also soft and blended with the previous colors nicely.
Notice that I have painted over the smoke that I originally left blank. I often change my mind in the middle of a painting. And as you will see in the next photo, I could have painted over the entire building (Sugarbush) with the background colors because the building is darker than the background.
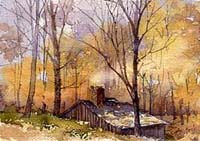
Step Four

The usual rule of thumb is never to paint around a dark object, as dark colors can be added over lighter colors easily.
There are other styles of paintings where objects are painted individually without painting a wash of color over the entire page....but that is another lesson, another time.
In this finished work, I lightly scrubbed out the smoke coming from the chimney, then painted the bare branched Autumn trees for detail. Notice that all of the trees are not alike. Some of the pale ones were done by laying down a bead of clear water and then dropping in a cool color. Others were painted with a stronger color to bring them forward. One of the rules of good design is variation....along with repetition.
The roof of the hut was painted around the autumn leaves that lay near the edge, and green was added to the foreground, leaving some of the autumn color to represent leaves on the ground.
<< Lesson 12: Watercolor Painting Lace
Advance to Lesson 13: Learning to paint with GREEN!>>
Return to Watercolor Lessons
Watercolor Painting Tips
Related topics:
Landscapes
Horizons
Snowy Landscape
A finished landscape painting

|

